
Saving Money With DIY: How to Install a Smart Thermostat
If you’re interested in installing a smart thermostat in your home, congratulations! This is a great way to control your home’s heating and cooling more efficiently, saving you some money over the long run. (And you’ll save even more if your AC unit is clean and running at top efficiency!) But performing this type of DIY installation isn’t for everyone. Learn how to install a smart thermostat — and whether this is a task you can handle — with our tips.
Time Required
If you have the right wiring in place, you can expect this process to take about 20-45 minutes. If you need an electrician to change some wiring, that task could take an additional up to 60 minutes, depending how easy it is to fish a wire through your wall and connect it to the HVAC unit.
Tools Required
If you’re ready to tackle the process of how to install a smart thermostat, you may need the following list of tools.
- Philips screwdriver
- Flathead screwdriver
- Masking tape
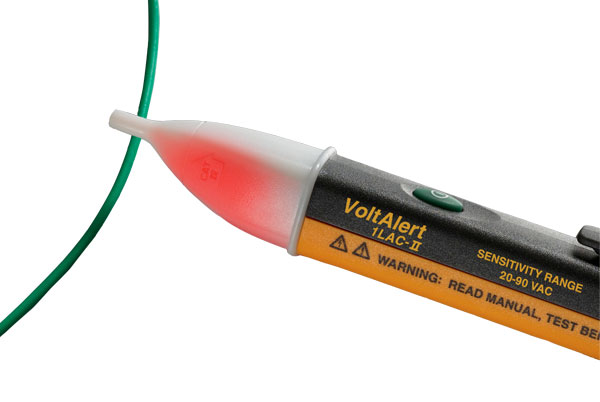
- Voltage tester
- Level
- Drywall repair spackle
- Paint brush and touch-up paint
- WiFi network password
- Smartphone
Savings
Certainly, you could pay to have a smart thermostat installed. Many electricians will do the job, as will heating and cooling system technicians. Electronics stores or hardware stores often will provide technicians too. However, if you need to change out wiring, only an electrician will do this part of the job.
If you purchase the smart thermostat at a store that offers installation, you may receive a break on the cost of installing it. Such technicians may also help you download the right app and connect the unit to your home WiFi network. Without a price break, anywhere from $50 to $100 is a common cost to install a smart thermostat.
If you need to have wiring added to accommodate the smart thermostat, you could pay another $75 to $200. However, some electricians will give you a break on the cost of the installation of the thermostat, because they already will be at the home to install the new wiring.
As long as you have the right type of wiring, this is a pretty easy installation process. So it’s worth saving some money to try it yourself. But if you’re at all uncomfortable around electrical wires, it’s probably worth spending a bit more to have it installed for you.
Do You Have the Correct Wiring?
If you live in an older home or you have an older furnace/AC system, the wiring needed to hook up a smart thermostat may not be present. To check your wiring situation, you’ll have to remove the current thermostat from the wall mount, as described in the next section. (After cutting the power, of course.)
Look at the wiring. You need to see multiple wires available, rather than a large cable with two copper wires inside it. If this is what you see, it’s likely a high voltage setup that’s common in older wiring systems. Most smart thermostats cannot work with high voltage wiring.
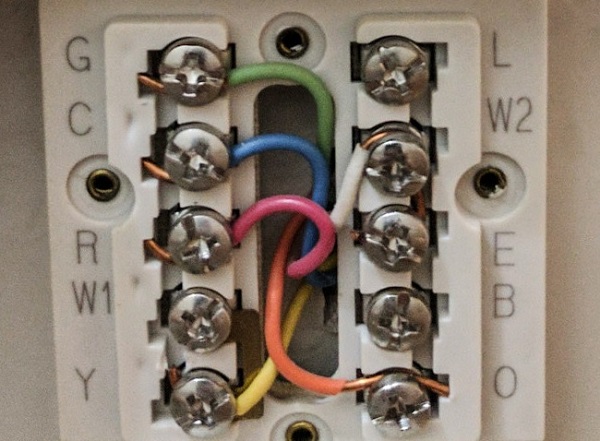
If you have small wires of multiple colors available — either separate or within one cable sleeve — this is a low voltage system, which works with smart thermostats. Each wire connects to a certain terminal on the smart thermostat. The “C” wire, short for common or continuous, is the most important wire to find. If you have a low voltage system, but you don’t have a C wire available, you will need to install one that connects to your HVAC unit.
It’s possible — but unlikely — that your smart thermostat doesn’t need a C wire to provide continuous electrical power. Read through the installation materials with your smart thermostat to see if a C wire is required.
A few smart thermostats can work with a high voltage system, but will still need a C wire. (Again this is possible, but unlikely.) You can try to install a C wire yourself and connect it to your HVAC system, but we wouldn’t recommend it. This is a job better served by hiring an electrician. And if you need to convert a high voltage system to a low voltage system, this again is something an electrician needs to handle.
- C/Blue/Black: Common or continuous wire
- G/Green: Controls the fan
- O/Orange: Controls heating system (sometimes replaced by an white wire)
- R/Red: Main power for overall system
- W/White: Controls heating system (sometimes replaced by an orange wire)
- Y/Yellow: Controls air conditioner or heat pump in system
Ultimately, these colors may not match what you have. It’s more important that you match the function of the wire from your current thermostat to the smart thermostat during installation. So if the white wire is connected to the R terminal on the current thermostat, connect it to the R terminal on the smart thermostat too.
Disconnecting Your Current Thermostat
To disconnect your current thermostat, turn off the circuit breaker for it. It may be the same breaker as for the furnace. It’s also possible that your furnace, AC unit, heat pump, and thermostat wiring are all on separate breakers. (Hopefully your system is well labeled.)
Additionally, turn off the switch that’s mounted near the furnace. (This switch will look like a light switch.) It’s important to cut all power to the HVAC unit and the thermostat before beginning this process, or you could cause damage to the unit.
Understand that some thermostats have batteries to power a display screen. So even if you cut the power at the circuit breaker, the thermostat may still appear to have power. Remove any batteries from the thermostat too. We’d suggesting using a voltage tester to ensure the power is off to the wiring for the thermostat before disconnecting the wires.
Remove the thermostat’s face plate, if it has one. Otherwise, the thermostat should lift away from the mounting bracket.
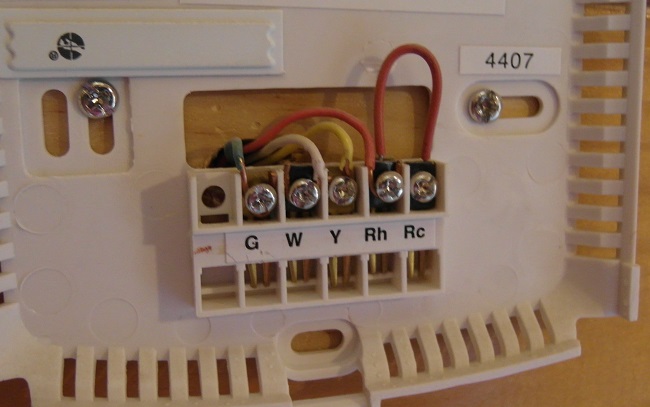
Once you can see the wires, use the voltage tester. After you’ve ensured the power is off, look at how the wires are connected to the current thermostat. If there are no labels on the wires, use masking tape to wrap around the wires and create your own labels. The labels you create must match what’s printed on the terminals of the current thermostat.
You may also want to snap a photo of how the wires are connected to the current thermostat, so you can see which wire colors connect to which terminals of the current thermostat. The photo will be a backup for you, should the labels fall off the wires.
Now disconnect the wires from the terminals on the current thermostat. Most will be connected via a screw, although some may fit into a clip.
Some thermostats make use of jumpers, which are short wires that connect one terminal to another. (You can see a jumper connecting the Rh and Rc terminals in the photo above.) You can remove any jumpers without labeling them. If your smart thermostat requires jumpers (which is rare), the unit’s instructions will tell you how to install them.
One problem you may find is that the wires coming out of the wall are very short. Once you disconnect them, it’s possible they could fall back into the wall. If you’re concerned about this, tape the cable to a pencil or screwdriver as you disconnect it so it can’t fall back into the wall.
Now carefully remove the mounting bracket from the wall. As you’re jostling the bracket, this is another time when a wire could slip back into the hole in the wall, so be very careful with this step.
Connecting the Smart Thermostat
The guidelines here for hooking up your smart thermostat are general in nature. Follow the instructions with your particular model of thermostat if there is a difference from our guidelines.
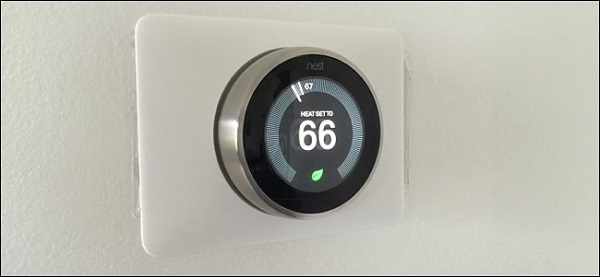
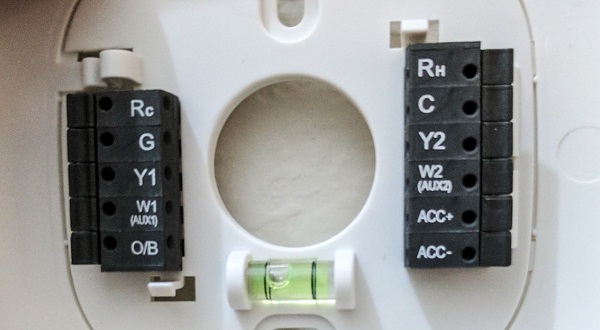
Attach the new mounting bracket to the wall. Make sure you center it properly so the wires from the wall are centered on the bracket. It’s important that the mounting bracket is level. (Some smart thermostat mounting brackets have built-in levels, as shown in the picture here.)
Most smart thermostats weigh very little, meaning you won’t need to drill into a stud or use drywall anchors. However, if your system ships with drywall anchors or if the instructions recommend using them, do it.
If the new bracket is quite a bit smaller than the bracket for the current thermostat, you may have to patch a few holes in your drywall. Depending on the last time the wall was painted, you may have to do some touch-up painting too.
Most smart thermostats will have you connect the wires to the mounting bracket/base plate. Each terminal on the base plate should be labeled clearly, so you know which wires to connect. You’ll either connect the wires to a terminal with a screw or with a built-in clip. After connecting a wire to a terminal, tug on it to ensure it’s tightly connected.
Make sure any extra length of wire is tucked back into the wall, so there’s room for the face plate.
It’s possible you may have extra wires that have nothing to connect to on the base plate. This is rare, but possible. Use a wire nut to protect the exposed area of the extra wire.
Next you’ll pop the face plate onto the mounting bracket/base plate. If the face plate requires batteries (which is rare) install them first. With a smart thermostat, there should be only one way to connect the face plate. If it doesn’t seem to fit quite right, look closely at the instructions. You shouldn’t have to use a significant amount of force to snap the face plate onto the base plate.
With everything hooked up, turn on the circuit breaker again. You should see the screen light up.
Connecting to the Network
Now you can make a connection between your home WiFi network and the smart thermostat. Most devices should give you on screen prompts for making the connection. Have your WiFi password handy. You’ll also may need to have the smartphone app for your particular model of smart thermostat installed before you can connect the thermostat to your WiFi network.
You’re then ready to use the unit! Take bit of time to study how the smartphone app works so you’re of the receiving all energy savings you can reap from using your new smart thermostat properly!
Related Posts


-
 20 Creative Ways to Reuse Your Old iPhone
Wondering what to do with your old smartphone when...
- Posted 2 years ago
-
6 Inexpensive Items to Upgrade Your Living Room this Weekend
Nothing like winter-weather-induced cabin fever to get your home...
- Posted 2 years ago
-
Five Best & Five Worst Things to Buy at Kohl’s
Looking for the best deals before your next trip...
- Posted 2 years ago


Hottest Deals on Ben's Bargains
-
 365-Day Price Low Deals Amazon17 hours ago
 -
Up to 75% off Today's Deals Amazon9 hours ago
-
-
-